Showing posts with label Punch Art. Show all posts

Tuesday, November 25, 2014

Grinch Punch Art and 2014 On-Line Extravaganza


I followed a video tutorial by Elaine Jackson of the UK for this sweet punch art Grinch for today's card!   I used really old pattern paper for the background.  It came from one of those square pattern packs from way back.  The sentiment is from this month's My Paper Pumpkin kit.  I messed up the stamping so restamped on a scrap piece and punched out with the ticket duo punch and re-aligned it.  It was the second piece of paper I ruined so decided to work with it and get 'er done!

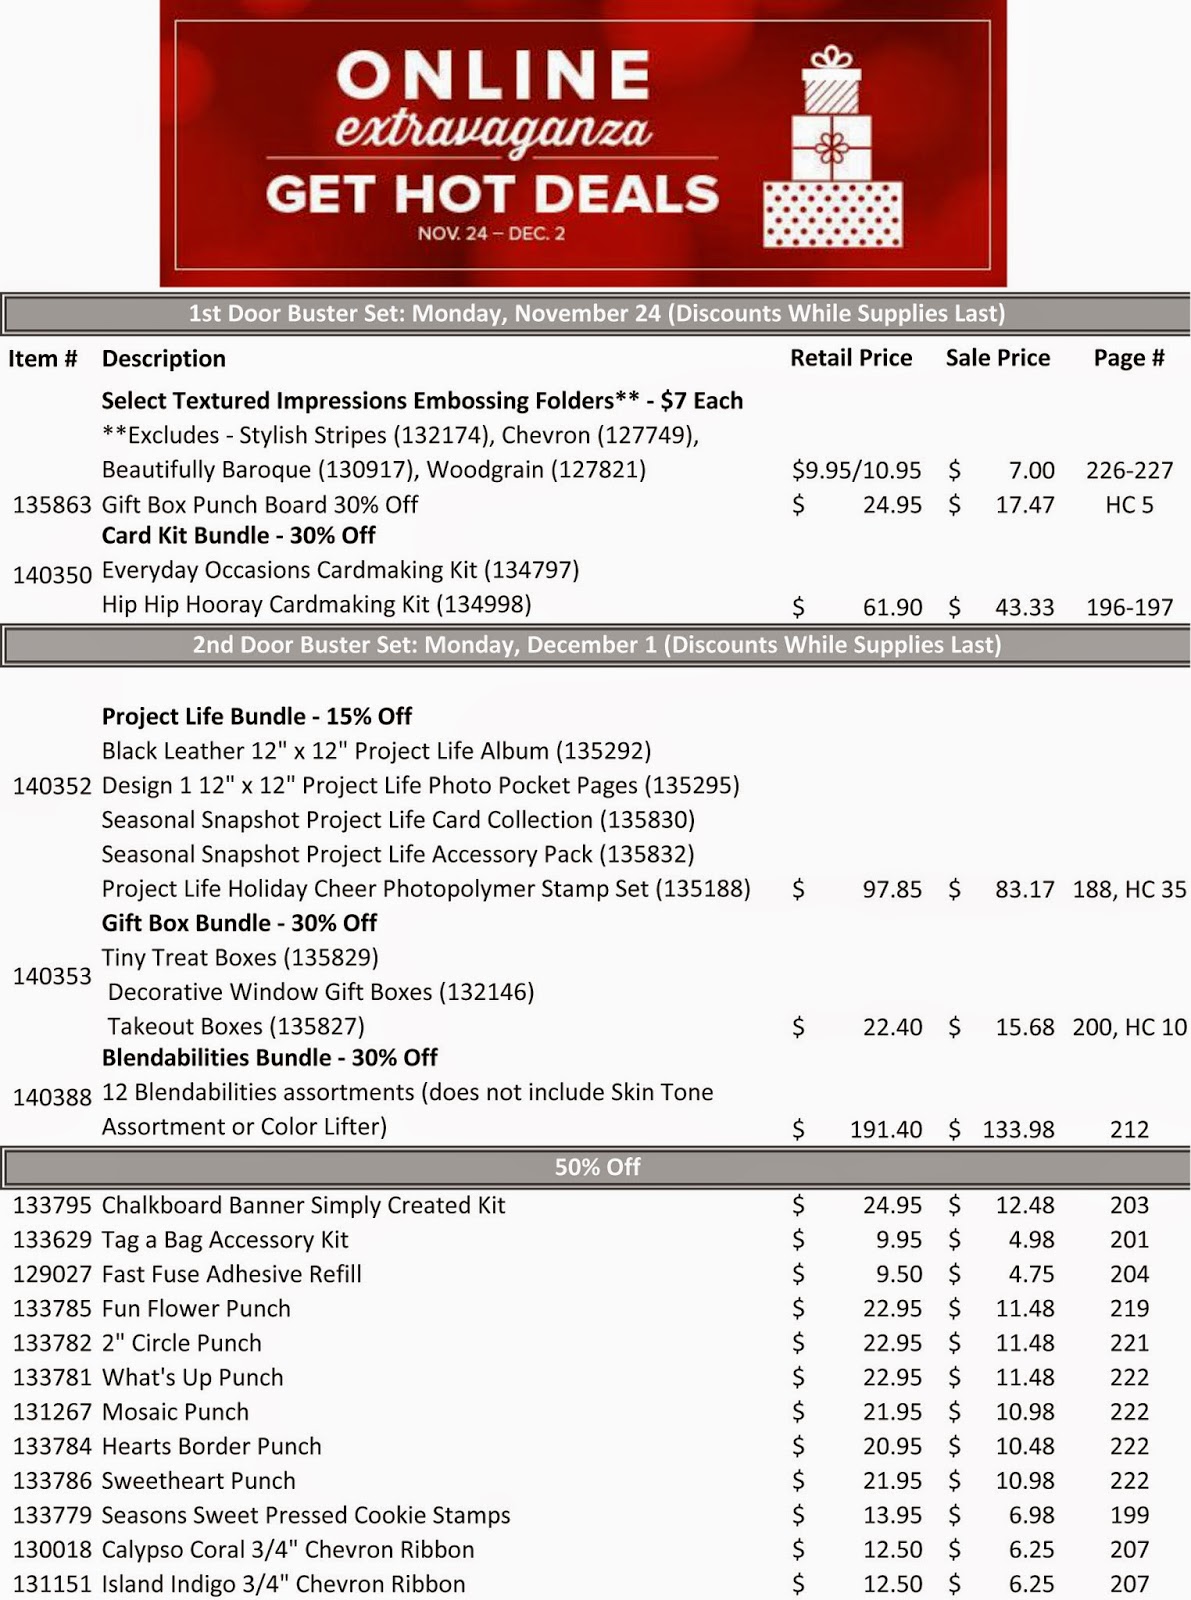
It's DAY 2 of the On-Line Extravaganza sales event!  The 1st day Door Buster specials are no longer available at the sale price but are available at regular prices.  NOTE:  although the embossing folders from this 1st day have reverted to regular price, there are THREE embossing folders on the WEEKLY DEALS page.   The Alphabet Press, Argyle and Fancy Fan embossing folders are available at 25% off (get them for $7.46@)

You can shop here....don't miss out on GREAT savings!


Thanks for stopping by!!

Cindy

+++++

Thursday, January 30, 2014

Minion - Happy 7th Birthday Sully!


Wishing our grandson Sully a VERY HAPPY 7th BIRTHDAY!!!  You're one in a Minion!!


Here he is proudly sporting his new smile!

++++


Card Credits:  Minion was made using the easy to follow tutorial by injoystampin 
I used the shaker frames to make the eyepiece and circle punches to make his smile

Lovingly made by
Gramma!

+++++


Friday, January 3, 2014

Petite Petals - Monkey Punch Art - Stampin' Up!


Happy 5th Birthday Andie!

Punch art is just FUN and I think this little monkey is adorable!  Just like my sweet granddaughter who turned 5 today!

The cute colourful flowers were made with the new Petite Petals stamp set which also has a co-ordinating punch.    I took the colours from the paper pack Fresh Prints.  The colours are bright and cheery!

I also used the new Fringe Scissors to make my accent piece.  A few quick snips and it's done… all neat and evenly spaced.

My card was made using the www.mojomonday.blogspot.com sketch #324.  It came together quite quickly once I decided on the sketch.

Credits:  Punch art by Jackie Topa
I saw the idea for the little tuft of hair and flower in the hair on a card by Chera Wiest.

Thanks for stopping by!

Cindy

+++++


Thursday, September 6, 2012

Punch Art Class - Dog, Snowman, Horse


Some very fun punch art!  Templates and/or instructions were from:

Dog:  Michelle Suit
Snowman:  Heidi Boos
Horse:  Jackie Topa

These are class projects and are easy and fun to do!  Each dog seems to have its own personality and you can make the horse more life like by giving it more sponging!  I did add a little glitter to the door of the frame on the snowman by using the little tree punch with glitter paper.  When I post individual photos, I'll make sure the  completed one is shown!

I kept the card bases simple so that it didn't take too long, but you could have a lot of fun creating backgrounds.  I'm going to try putting the dog in a doghouse card!

I'm off to Nanaimo for a couple of weeks.  So no stamping for me for a bit!

See you soon.

Cindy

+++++

Monday, June 4, 2012

Dog Punch Art - Belated Birthday

Isn't this punch art dog just the cutest!!!  I love him!  The inside of the card says "a little late"  This is a workshop card so I kept the card design simple, seeing as all the time will be spent creating this little pooch.

The dog punch art is another brilliant creation of Jackie Topa.  She did a great job coming up this guy.

Stamp Sets:  On Your Birthday, Pennant Parade, Wood grain
Punches:  xl oval, wide oval, large oval, 1 3/4" circle, 3/4" circle, 1/2" circle, heart, heart to heart, scallop oval, pennant, Itty Bitty, slot, word window

Thanks for stopping by!

Happy....punching!

Cindy

+++++

Saturday, December 17, 2011

Stocking Die - Penguin Punch Art

No stamps used in the construction of this project!!

An adorable gift card holder designed by another Stampin' Up! demonstrator, Michelle Suite, using the Stocking Die.   She provided a video on a demonstrator website making construction quick and easy.  Thank you Michelle for your generosity!  It folds at the top; opens from the bottom and inside is a flap where you can insert a gift card.

My little penguin is made from the owl punch and a 1" circle punch.  Isn't he cute?!

The snowflake is one of the dies from the Snowflakes Set #2 and the silver glimmer paper.  Unfortunately, Stampin' Up! has just announced the dies are no longer available as the manufacturer has discontinued them.

Texture is added to the stocking with the Snowburst Embossing Folder and the Stripes Embossing Folder.  You can get the Stripes folder free as one of the options in Sale-a-bration that starts Jan. 24.  For every $60 you spend you can choose a Sale-a-bration item for free!!  It's coming up quickly!!

Have a blessed Christmas!

Cindy

+++++

Wednesday, November 16, 2011

Punch Art Duck - Playful Polka Dots

How fun is this little punch art duck?!  Made with the Playful Polka Dots Simply Scrappin' Kit from the 2011 Summer Mini...I made this in the summer; just a little slow in uploading it my blog!  All the embellishments are from the kit.  I love this little duck!

Now, if I recall correctly the punches used were:
Ornament punch; 1 3/4" scallop circle; boho blossoms; large oval; small oval for the lower part of the mouth.
Colors:  Daffodil Delight and Pumpkin Pie

Next post will suit the season a little more!!

Thanks so much for stopping by!

Cindy

+++++

Thursday, October 27, 2011

Frostwood Lodge - Box In A Bag

This project starts out with a 4 1/2" square piece of card stock to make a small box base.  Use your favourite DSP (Frostwood Lodge from Holiday Mini used here) for the "bag" portion.  I made a few and filled them with coffee beans, nuts and chocolate using the medium sized cello bags on page 181 of IB&C.

My flower was made using the Blossoms Petal Builder punch.  I saw a video on YouTube by Create with Dee showing how she ran it through the Big Shot after assembling.

Tall one is using 6 1/2" DSP; small one uses 5 1/2" DSP.  Woodgrain background stamp was used on the scalloped border and Round Tab Punch handles.

It's a perfect time of year to start working on your Christmas cards and 3D projects!!  Order your supplies on-line through my Stampin' Up! website


or call me directly! (807) 735-3336  I will assist you with Stampin' Up!'s wonderful product line or with any projects you have in mind.

Thanks for stopping by!
Cindy

+++++


Thursday, September 22, 2011

Ladybug Olivia

Happy 2nd Birthday Olivia!!

I wanted to make a card with a ladybug for my granddaughter's 2nd birthday.  Once I got the ladybug made it was harder to pull the card together.  I thought this was okay until I uploaded the photo and thought it just doesn't look right.  I think it's because the ladybug is disproportionate to the little pinwheel.  So I'll have to go back to the drawing board to design another.

However, I don't think Olivia minded at all how the card looked.  It was filled will more than adequate amounts of love from her Gramma and Grandpa!!  LOVE YOU OLIVIA!  Happy Birthday!!

+++++

Wednesday, September 21, 2011

Happy 7th BIrthday Liam!!


My oldest grandson turned 7 today!!  Hope you have a fabulous day Liam!!

His favourite thing now is Lego.  Several months ago I mailed all of my daughter's childhood Lego to him and his brother.  I think it has provided his mom with many hours of peace and quiet!

His mom made him a Lego invitation, so I made a Lego birthday card.  The worker was clip art I printed off the computer and the blocks of course were made from card stock and a 1/2" circle punch.  Sponge the edges, add dimensionals and you are done.  I used some retired colours; Yo Yo Yellow, Glorious Green, Brilliant Blue.  Real Red was also used.  This is about as simple as punch art gets!

Happy Birthday to Liam!  Tomorrow it's your sister's day!

Thanks for stopping by!
Cindy

+++++

Tuesday, August 23, 2011

Butterfly Punch Art

Convention is over, so it's time to share some of the items I had on display at my Stampin' Up! table.

A couple of friends and myself have a new found interest in punch art.  This little gal was created as a birthday card for Lori, one of these friends.  The paper for this first one is from the DSP that is available as a hostess selection, called Cheerful Treat. 

When I brought the first card to show my daughter, my granddaughter wanted to hold it.  I couldn't let her play with it (she's 2!) so I told her I'd make her one.  The background paper is from the now retired Ice Cream Parlor.

Well, my grandson (age 4) was recovering from heart surgery and not well at that time, so I couldn't leave him out, so I made him one too!!

My daughter needed a birthday card for a friend's little girl so...okay...  I'll make one for her too!!

I've got a few more ready to assemble and then I think it's time to move on to the next punch art!

This was a paid tutorial from Kim Score of Paper Punch Addiction.


Friday, July 29, 2011

One Bright Punch Art Duck!!

This punch art duck is another card courtesy of Jessica, my friend's daughter-in-law.  Now, Jessica is back in BC, so I'll have to come up with my own new cards :P  She has made a punch art addict out of my friend Lori, so there is likely more to come!

***

I am almost finished getting my kits ready for Mining for Memories Convention here in Red Lake.  So if you live in the area and haven't registered, there is still time.

Give Catherine a call at 662-1149.

Cindy

+++++

Thursday, July 21, 2011

Dragon Punch Art

My friend Sheila invited me to make this card with her and another friend Lori.  Once again Jessica (Sheila's daughter-in-law) came up with this cute dragon for us to try.  Basically, it's made with the oval punches, circle punches and boho blossoms punch.  I had drawn on his eyes and when I uploaded it to this post, I realized what a horrid job I did on them.  So off came his snout and I used one of the hearts from the 3 heart punch; cut it in half and he got some new eyes!   I'd like to say this little guy was hassle free, but that would just not be the case!!  We did however have loads of fun and lots of laughs and I think he is adorable!

Cindy

+++++


Thursday, December 23, 2010

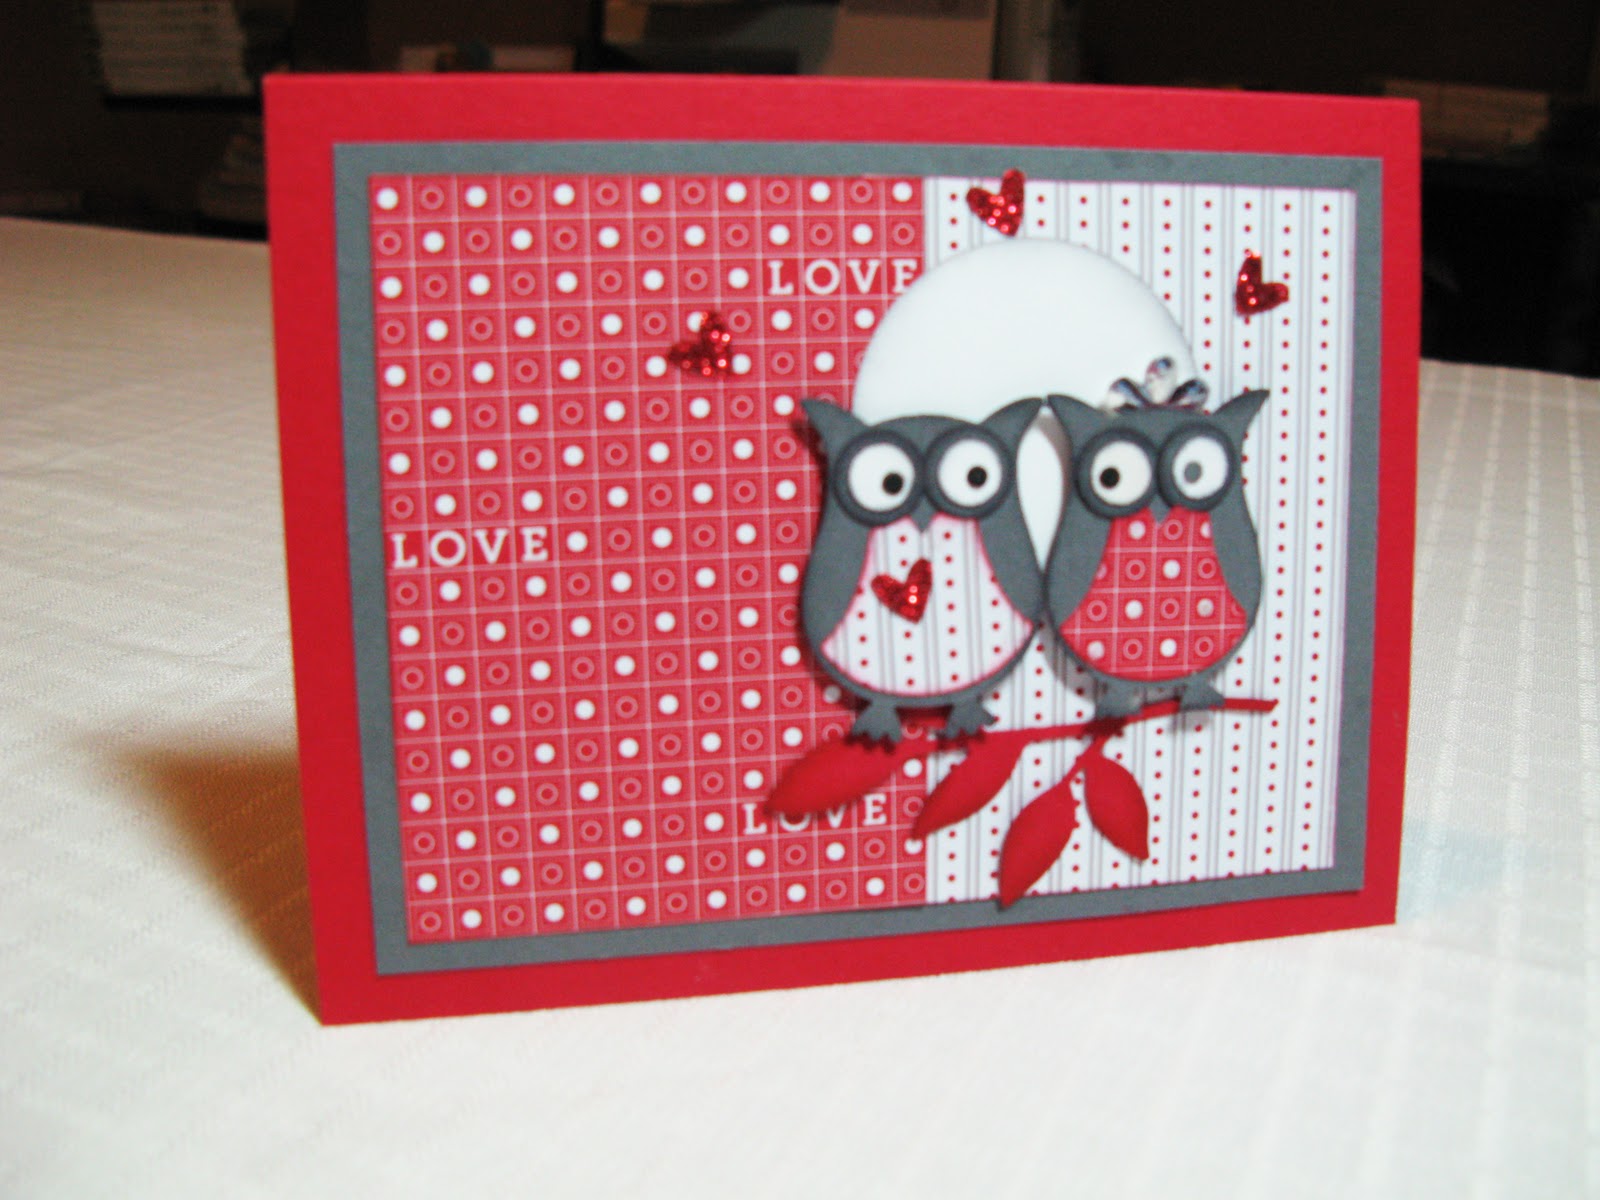
Valentine Owls

From Christmas owls to Valentine owls!


I'm letting the new Specialty Designer Series Paper Love Impessions do all the work here, with a little help from the new Glimmer Paper.  Both these will be available Jan 4, 2010 from the Occasions Mini Catalogue.  And of course, the owl punch and little leaves die are useful once again.  No stamping here; I've allowed the wording in the paper be my sentiment. 

This card used the Clean and Simple  FTL#120.  Didn't follow it exactly, but it gave me a starting point.


Everything is Stampin Up except the "crown" on the little lady's head.  It was a small metallic flower that I glued to the back of her head to make it look like a crown or tiara.

I LOVED SO MUCH in the mini!!  So, there will be more featuring these great products in the days ahead.

Thanks for stopping by!

Cindy

+++++

Wednesday, November 24, 2010

Chocolate Bar Ribbon Slide

One of the projects I did with our Stamp Club For November.  We had lots of fun.  The idea for the owls was CASEd from Kay Kalthoff aka Speedystamper on Splitcoast.

Don't they make a cute couple!!
This little project holds one of the large chocolate bars.  Decorate them any way you wish and you have an inexpensive gift for someone on your list.

Just pull the ribbon and the chocolate bar comes out.  You could even attach a gift certificate or money to the bar.  I think it's a fun way to spread some joy.

They are not just for chocolate bars.  Change the size and you can put microwave popcorn (with a movie gift certificate) or hot cocoa packets, different size bars, etc.


Just a close up of the cute couple!  Apparently she is not impressed with his reindeer head gear.


All products Stampin' Up!
Stamp Sets:  Teeny Tiny Wishes; Serene Snowflakes
Paper:  Real Red, Whisper White, Candy Cane Christmas DSP, Chocolate Chip, Crumb Cake, Garden Green
Ink:  White Craft Ink, Baja Breeze and Chocolate Chip, Real Red
Accessories:  Owl Punch, White Organza Ribbon, Modern Label Punch, Little Leaves Die, Snowflake Punch, Circle Punch


Monday, May 31, 2010

Sock It To You!

I was asked to come up with a little craft for kids to put together. (Thanks Carolyn!) That's how this sock monkey was born! I had a little extra paper left over and these are the cards I made.


Once I find a suitable sentiment, I'll tuck it in there somewhere.


I don't have the sock monkey stamp set, but I sure would like to put a banana on this one with the Island Oasis DSP. I used the balloons from the Cupcake set and shined them up with some clear embossing powder. I will likely put a chipboard number below the balloons for the recipient when I know who I want to give it to.


Can you picture more ideas to create with this monkey?! I never gave sock monkeys a second thought until I played with these and now have a liking for the little monkeys! All punches, papers and embellishment's are Stampin' Up!


Cindy